Work continues, but the "to do" list is getting shorter!
This time around I tackle the manifold and carb. The manifold is easy: Put the two pieces together and paint them. Well, it is not that easy. There was no need to separate the intake manifold from its partner the exhaust, but wanting to clean everything up, I did. The tricky thing is, that these two parts must be flush at the end where they meet the head, so if in doubt have them shaved so that they doi. I had this done at the same time as the head and block. Do remember to add the little tab for the accelerator retraction spring, you do not want to remember this after everything had been painted.
 Speaking of painting, I go back to using the Por 15 High Temperature Coating. Manifold grey will do nicely here. I took the opportunity to paint the studs, nuts and the fancy "wings" (manifold bridge according to the parts book). The paint goes on pretty goopy. Having used it about 5+ years ago I had forgotten how it performed... or the paint had gone bad. Lucky for me, it was the former and it dried with smooth surface. Well, as smooth as a cast iron piece can be.
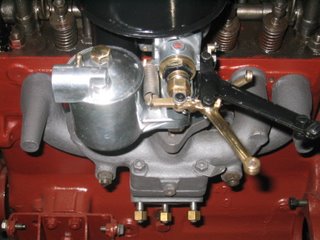
What a nice way to top a manifold than with a carburetor! The down draft SU does turn a few heads. At the Hudson British Car Day I overheard a few fellows discussing the Roadster's carburetor. From what they were saying, they thought that this was a modification and would probably not work. Tsk tsk tsk. Unfortunately I did not have the chance to educate them on the finer points of this British design.
I received a beautiful carb from Mr. Len Percey. He had gone to the trouble to get it prepped for me by blasting it with walnut shells and did a great job. Too bad it was the wrong size. As I prepared the carb for installation, I realised that although it looked like the right one, it did have some important differences. The flange to mount the carburetor to the manifold was 90 degrees from where it needed to be. Plus it was a full 1.5 inches taller and the throat was bigger. This would have led to a few fit problems with the air cleaner and possibly an interference isue with the bonnet.
 What to do. What to do. The donor carb was in excelent shape, bigger, but excellent. Now, when I bought my Roadster in 1999, it included a myriad of bits and pieces. There were a few boxes, one contained a half full box of miscellaneous nails - rusted together. There were some carburetor parts, but since there was a complete carb on the engine, I paid it no mind, in fact I had forgotten about it! This was until I was until I was going through my parts bins looking for shocks for the Super Ten.
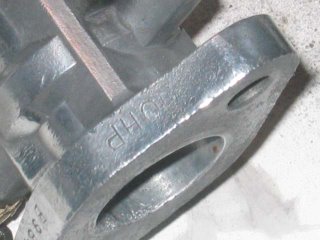 What I found was a fairly complete down draft carb. Lucky for me, the parts that it was missing were ones that I could transfer from the other! I needed to make a few modifications to the accelerator lever so that it could double as an attachment point for the spring, but that was a snap! Once I knew that I had everything I needed, I thought that it would be nice to polish up some of the bits. LAter I found a stamp on the mounting flange. Hard to read I made out "10HP". This had to have been the original carb for the 10 HP engine that is currently in the Roadster! More luck!
 With everything to be polished polished, and the other bits cleaned up, I was ready to reassemble the carb. The trickyest part of all of this is ensuring that the needle is aligned properly with the hole in the shaft that is controled by the choke knob. Should these not be aligned then the needle will bind, or not seat completely creating a whole slew of problems.
 I inserted the needle into the hole in the piston. The shoulders of the needle should line up flush with the face of the piston. With this done, I assembled the rest of the "bell" and attached it to the body of the carb. Be careful not to bend the needle, a bent one works worse than one that is not aligned.
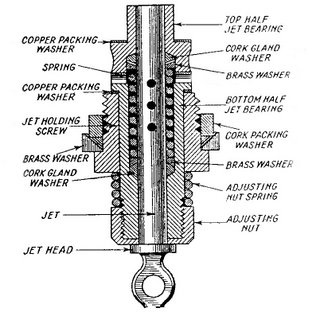 Assemble the cork gland washers that form the jet portion of the carb. The way that the jet assembly works is that petrol from the carburetor bowl flows into the jet. The flow is controled by the needle which is controled by the piston which is controled by the vacuum produced by the engine which is controled by the butterfly valve which is attached to the accelerator peddle. The further back the needle is the more petrol flows. This is also how the choke mechanism works, by pulling the jet away from the needle, even more petrol is sent to the engine. The small cork gland washers ensure that the petrol flows only through the jet. If you noticed the old seals that you took out of the carb as you may have seen the two oblong washers. They are trapped by each and of the chamber and again by a dished brass washer held in tension by a spring. Hold the internal jet parts in by lightly screwing in the jet holding screw and large brass (or alloy) washer and cork packing washer. We have not aligned the jet yet, so do not tighten it too much. Now we add the spring and jet adjusting nut at the end of the jet. The jet adjusting nut controls the distance that the jet is from the needle in its normal position anf thereby the mixture. For an initial setting, you first turn the jet adjusting nut until it stops. Then back off seven flats (a turn and a flat).
 Insert the jet into the assembly and then tighten jet holding screw. Once the jet assembly is in place the pressure on the washers to the cork gaskets makes them swell around the shaft of the jet. It is for this reason that we use a rebuild kit whenever we dismantle the jet. Check that the piston (and needle) operate smoothly and if it does not, then slacken off the jet screw and try again.
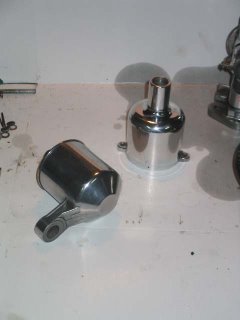
Assemble the rest of the carb by adding the choke cable holder and arm, the spring, and in my case the throttle advance.
Looks good, but the proof will have to come later.
By the way, to adjust the carburetor to the right fuel/air mixture you follow this procedure:
- Get the engine to its normal working temperature.
- with the engine idling at approximately 1500 RPM (higher than usual), move the piston 1/16 of an inch using a wire or small screw driver.
If the engine speeds up then the mixture is too rich and you should tighten up the jet adjusting nut.
If the engine quits then the mixture is too lean and you should loosten the jet adjusting nut.
If the engine continues to run but struggles then it is ok.
When making adjustments, turn the jet adjusting nut a flat at a time.
This time around I tackle the manifold and carb. The manifold is easy: Put the two pieces together and paint them. Well, it is not that easy. There was no need to separate the intake manifold from its partner the exhaust, but wanting to clean everything up, I did. The tricky thing is, that these two parts must be flush at the end where they meet the head, so if in doubt have them shaved so that they doi. I had this done at the same time as the head and block. Do remember to add the little tab for the accelerator retraction spring, you do not want to remember this after everything had been painted.
 Speaking of painting, I go back to using the Por 15 High Temperature Coating. Manifold grey will do nicely here. I took the opportunity to paint the studs, nuts and the fancy "wings" (manifold bridge according to the parts book). The paint goes on pretty goopy. Having used it about 5+ years ago I had forgotten how it performed... or the paint had gone bad. Lucky for me, it was the former and it dried with smooth surface. Well, as smooth as a cast iron piece can be.
What a nice way to top a manifold than with a carburetor! The down draft SU does turn a few heads. At the Hudson British Car Day I overheard a few fellows discussing the Roadster's carburetor. From what they were saying, they thought that this was a modification and would probably not work. Tsk tsk tsk. Unfortunately I did not have the chance to educate them on the finer points of this British design.
I received a beautiful carb from Mr. Len Percey. He had gone to the trouble to get it prepped for me by blasting it with walnut shells and did a great job. Too bad it was the wrong size. As I prepared the carb for installation, I realised that although it looked like the right one, it did have some important differences. The flange to mount the carburetor to the manifold was 90 degrees from where it needed to be. Plus it was a full 1.5 inches taller and the throat was bigger. This would have led to a few fit problems with the air cleaner and possibly an interference isue with the bonnet.
 What to do. What to do. The donor carb was in excelent shape, bigger, but excellent. Now, when I bought my Roadster in 1999, it included a myriad of bits and pieces. There were a few boxes, one contained a half full box of miscellaneous nails - rusted together. There were some carburetor parts, but since there was a complete carb on the engine, I paid it no mind, in fact I had forgotten about it! This was until I was until I was going through my parts bins looking for shocks for the Super Ten.
 What I found was a fairly complete down draft carb. Lucky for me, the parts that it was missing were ones that I could transfer from the other! I needed to make a few modifications to the accelerator lever so that it could double as an attachment point for the spring, but that was a snap! Once I knew that I had everything I needed, I thought that it would be nice to polish up some of the bits. LAter I found a stamp on the mounting flange. Hard to read I made out "10HP". This had to have been the original carb for the 10 HP engine that is currently in the Roadster! More luck!
  With everything to be polished polished, and the other bits cleaned up, I was ready to reassemble the carb. The trickyest part of all of this is ensuring that the needle is aligned properly with the hole in the shaft that is controled by the choke knob. Should these not be aligned then the needle will bind, or not seat completely creating a whole slew of problems.
 I inserted the needle into the hole in the piston. The shoulders of the needle should line up flush with the face of the piston. With this done, I assembled the rest of the "bell" and attached it to the body of the carb. Be careful not to bend the needle, a bent one works worse than one that is not aligned.
 Assemble the cork gland washers that form the jet portion of the carb. The way that the jet assembly works is that petrol from the carburetor bowl flows into the jet. The flow is controled by the needle which is controled by the piston which is controled by the vacuum produced by the engine which is controled by the butterfly valve which is attached to the accelerator peddle. The further back the needle is the more petrol flows. This is also how the choke mechanism works, by pulling the jet away from the needle, even more petrol is sent to the engine. The small cork gland washers ensure that the petrol flows only through the jet. If you noticed the old seals that you took out of the carb as you may have seen the two oblong washers. They are trapped by each and of the chamber and again by a dished brass washer held in tension by a spring. Hold the internal jet parts in by lightly screwing in the jet holding screw and large brass (or alloy) washer and cork packing washer. We have not aligned the jet yet, so do not tighten it too much. Now we add the spring and jet adjusting nut at the end of the jet. The jet adjusting nut controls the distance that the jet is from the needle in its normal position anf thereby the mixture. For an initial setting, you first turn the jet adjusting nut until it stops. Then back off seven flats (a turn and a flat).
 Insert the jet into the assembly and then tighten jet holding screw. Once the jet assembly is in place the pressure on the washers to the cork gaskets makes them swell around the shaft of the jet. It is for this reason that we use a rebuild kit whenever we dismantle the jet. Check that the piston (and needle) operate smoothly and if it does not, then slacken off the jet screw and try again.
Assemble the rest of the carb by adding the choke cable holder and arm, the spring, and in my case the throttle advance.
Looks good, but the proof will have to come later.
By the way, to adjust the carburetor to the right fuel/air mixture you follow this procedure:
- Get the engine to its normal working temperature.
- with the engine idling at approximately 1500 RPM (higher than usual), move the piston 1/16 of an inch using a wire or small screw driver.
If the engine speeds up then the mixture is too rich and you should tighten up the jet adjusting nut.
If the engine quits then the mixture is too lean and you should loosten the jet adjusting nut.
If the engine continues to run but struggles then it is ok.
When making adjustments, turn the jet adjusting nut a flat at a time.
No comments:
Post a Comment