First, the head must be in place and tightened down. We do not want a fraction of a millimeter interfering with our precise measurements!! After all, I am sure that when these engines were first assembled there were teams of engineers with micrometers adjusting everything to ensure precise installation. Or, there was a method that the skilled worker with a minimum of tools could set up everything simply and accurately.
There is one method which I have come to know as the "Smiley Method". This was shown to me by Bill Haverly during his visit to my garage some years ago. Since I shared this little gem in an article I wrote it has created some debate over who first discovered this trick. Especially since I would figure that it was someone at the Singer factory. I let those who have more time, energy and/or sense, debate its origin. I am content in knowing that it works and has helped me, and many others out there, get their cars up and running. On a side note, one of the factors in my acquiring my Roadster in 1999 was that the previous owner could not get the engine to work. I was as oblivious as he as to why (so I did not take advantage of this fellow) but now can see how this situation could and did arise.
With the head now in place, I install the chain tentioning gear. I find it easier to do this now before the chain and cam gear are installed. This assembly will interfere with the valve timing process so once everything is attached, I use a wire to pull it away from the area and keep it in that position by securing the wire to a stud or bolt through the breather hole and onto a stud or bolt.
The timing chain will ultimately drop into its channel at the front of the engine. A coathook (or similar device) can be used to fish for it. Should this occur DO make sure that the chain is around the gear on the lower gear on the intermediate timing shaft.
SMILEY FACE METHOD
WARNING - This will likely require a lot of fiddling around with the cam gear, chain, crank, etc.
1) Find Top Dead Center (TDC) for the crank.
 2) Rotate the cam until the lobes for cylinder one are pointing up at the 10 & 2 o'clock positions. The three studs at the front of the cam should be arranged with the top two parallel to the face of the block/head. With the engine on a stand, I adjusted it until it was level, then I could use a level resting on these studs to ensure that the cam was indeed in the proper position.
 3) Slip the cam gear into its chain and while ensuring that there is no slack on the "exhaust manifold side", attempt to find which of the hole pattern fits in the studs WITHOUT rotating either the crank or the cam. If you get it perfect on your first try, proceed immediately to your nearest lottery outlet and buy one ticket for the biggest prize. With your luck, you only need one. If you are like me, then you will need to adjust the cam gear by rotating it, replacing it in the chain, trying again, rotating it, replacing it in the chain, trying again, rotating it, replacing it in the chain, trying again until at last you get that satisfying click as it glides in place.
4) Put in the washer, lock washer and bolt to secure the gear. I do not tighten it up fully at this point, because I want to test it all before I commit to tightening it all up.
I turn the crank a time or two, ensuring that I get it back to TDC. Then I inspect the "eyes" and "ears" of the cam and if all checks out, I tighten away. If not, then it is back to step 3. Better safe than sorry.
5) Once you are satisfied with the alignment, the chain tenionning gear can now be released from the wire holding it back.
 6) You can now see how close the oil feed pipe from the block is to the timing chain and gear! Secure the pipe in place and ensure that it does not touch any moving part (duh). We can also install the continuation of the oil feed pipe for the head. I attach it to the center cam bearing first, leaving enough slack in the nut to let me move the pipe if necessary. Then to the union joint for the newly secured feed tube from the block. A final tightening of the nut at the center cam bearing and attaching the clip
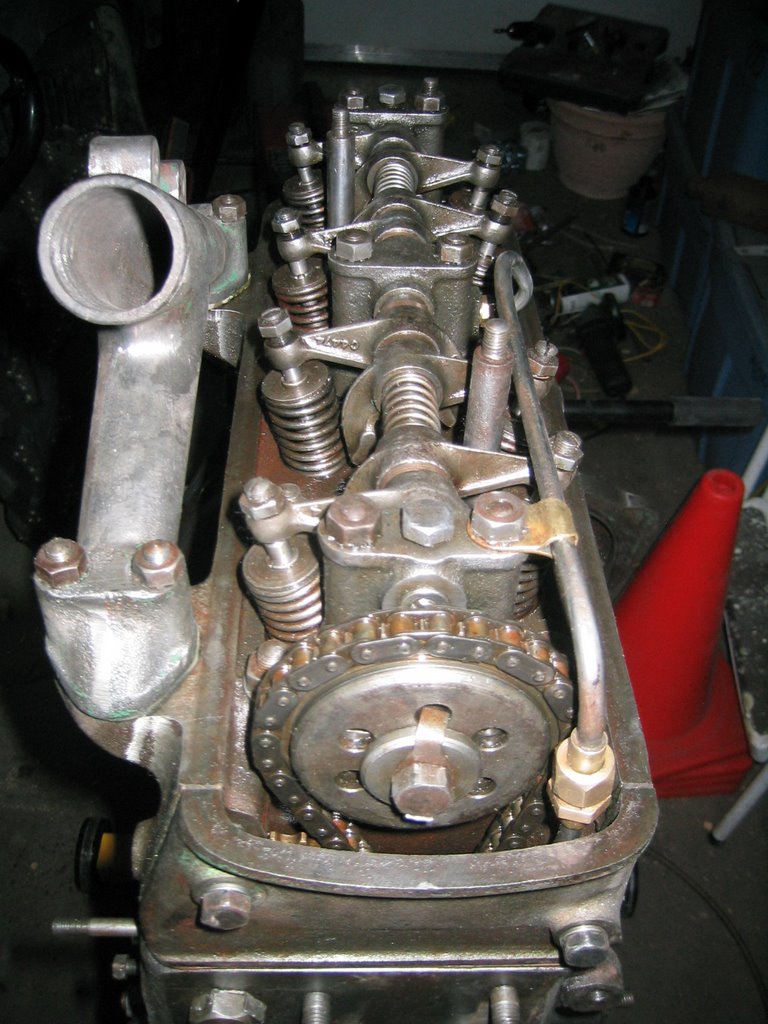 to the forward stud and voila!
Your timing should now be set up for starting... which we will not do until the other parts are installed and the engine is in place.
Speaking of which, lets install the timing gear cover plate and the upper water manifold.
What is next, well that is a horse of a different colour!
3 comments:
Hello
Can i ask you some question
Can i ask you aquestion
Koudekernl
Singer 4ad
Post a Comment