Ok, I have left this long enough. Time to get some parts off the bench and on the engine!
I maneuvred the engine onto a jack. This arrangemebt would also help later (I hope) with the installation into the car. For now it will suffice in letting me attach the flywheel, clutch and gearbox.
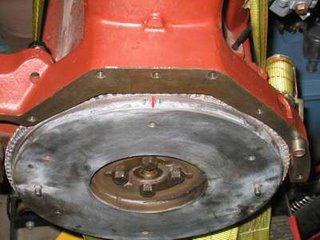 With the flywheel off the car, I took the opportunity to add a red highlight to the TOP and 1/4 marks to make them easier to see. I picked red since it is my favorite colour (the red is similar to the one used on pre-war Alfa 1750's).
Lining up the pins on the crank, the flywheel is put in place. I add the bushing in the end of the crank (for the pin end of the gearbox shaft). The 4 bolts and their 2 securing clips are installed and tightened... tightly!
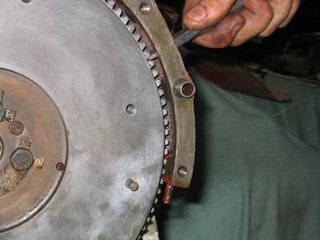 To avoid spinning the flywheel while tightening the bolts, I insterted a chisel in the viewing hole on the side of the block.
here is no use having a flywheel without the mechanism to connect it to the gearbox!
One tricky thing (for those who have never done this before) is aligning up the clutch plate with the pressure plate and the gearbox shaft. The first time I did this I used a wooden dowel wrapped up with tape! It worked... barely.
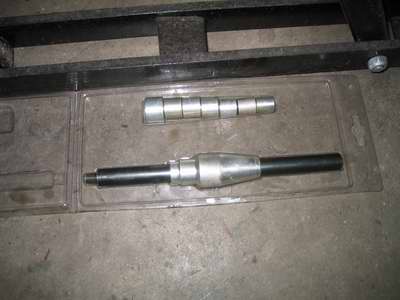
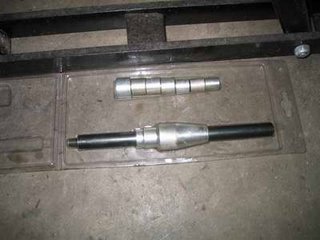 This time around I decided to use a better tool... barely. I obtained a universal clutch alignment tool. My first clue as to why it would not work as is was the key word "universal". As we have discovered, Singers are anything but universal, rather they are unique!
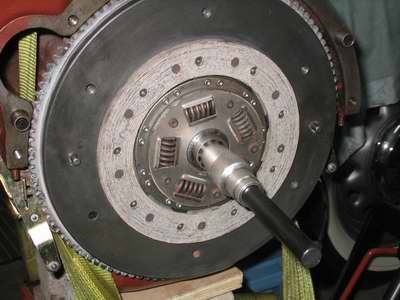
The idea here is to have the shaft of the tool to fit in the bushing in the back of the crankshaft. Another part of the tool then fits in the hole of the clutch plate and voila! aligned.
 This simple idea was achieved after some milling of the smallest "bushing end" piece of the alignment tool to allow it to actually fit in the bushing.
 With this done, and the clutch plate in place, the pressure plate could now be installed. Aligning pins ensure that the pressure plate is correctly oriented. Then the 6 bolts are installed. I proceeded to tighten the bolts, a few turns at a time cris-crossing as I proceeded so that the forces of the bolts would be evened out during this process.
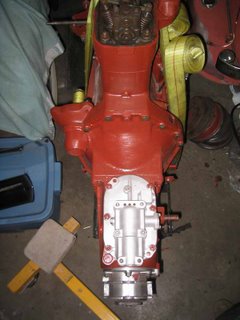 With all this in place, the gearbox was installed and slid on with ease!
My next post will show me in the hospital after throwing out my back during the engine/gearbox installation process.
I maneuvred the engine onto a jack. This arrangemebt would also help later (I hope) with the installation into the car. For now it will suffice in letting me attach the flywheel, clutch and gearbox.
 With the flywheel off the car, I took the opportunity to add a red highlight to the TOP and 1/4 marks to make them easier to see. I picked red since it is my favorite colour (the red is similar to the one used on pre-war Alfa 1750's).
Lining up the pins on the crank, the flywheel is put in place. I add the bushing in the end of the crank (for the pin end of the gearbox shaft). The 4 bolts and their 2 securing clips are installed and tightened... tightly!
 To avoid spinning the flywheel while tightening the bolts, I insterted a chisel in the viewing hole on the side of the block.
here is no use having a flywheel without the mechanism to connect it to the gearbox!
One tricky thing (for those who have never done this before) is aligning up the clutch plate with the pressure plate and the gearbox shaft. The first time I did this I used a wooden dowel wrapped up with tape! It worked... barely.
 This time around I decided to use a better tool... barely. I obtained a universal clutch alignment tool. My first clue as to why it would not work as is was the key word "universal". As we have discovered, Singers are anything but universal, rather they are unique!
The idea here is to have the shaft of the tool to fit in the bushing in the back of the crankshaft. Another part of the tool then fits in the hole of the clutch plate and voila! aligned.
 This simple idea was achieved after some milling of the smallest "bushing end" piece of the alignment tool to allow it to actually fit in the bushing.
 With this done, and the clutch plate in place, the pressure plate could now be installed. Aligning pins ensure that the pressure plate is correctly oriented. Then the 6 bolts are installed. I proceeded to tighten the bolts, a few turns at a time cris-crossing as I proceeded so that the forces of the bolts would be evened out during this process.
 With all this in place, the gearbox was installed and slid on with ease!
My next post will show me in the hospital after throwing out my back during the engine/gearbox installation process.
No comments:
Post a Comment